You’ve got everything you need to set up your very own gallery-like photo and art display. You have the hooks, cables, and the instructions. Now what?
Although the instructions are there to guide you, it still helps to know a thing or two about the actual
picture hanging hardware you’re using. And that’s what this article is all about.
Get to know the components and the things you should and shouldn’t do when using
gallery systems!
Picture Rail Systems at a Glance
Picture rail systems are a hassle-free hanging method that provide the elegance of a photo or art display, similar to what you would find in an
art gallery. Because an Ogee molding is already installed, you don’t have to worry about drilling additional holes in the wall to hang your items.
Picture rail systems allow you to hang multiple pieces from cords that hang from a rail that is installed on the wall. The best part is that you can change the wall layout anytime with ease! Learn more about these types of
picture hangers below.
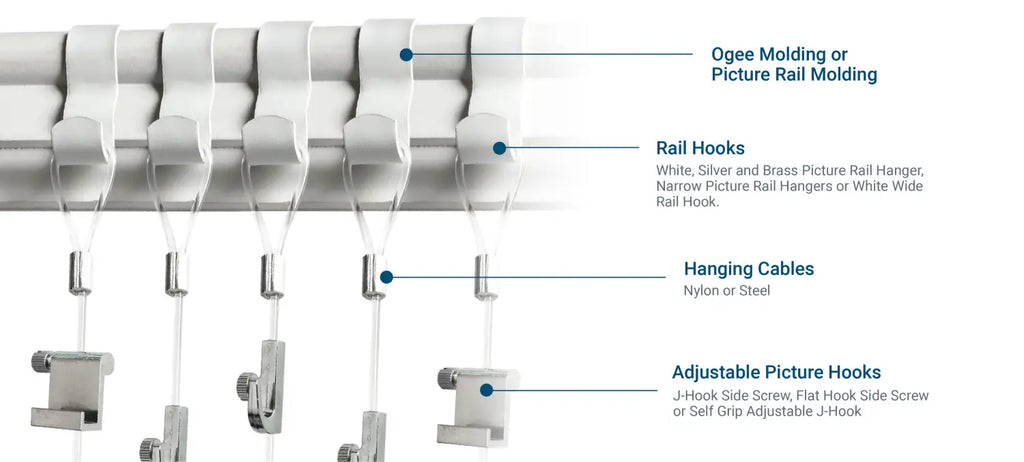
4 Components of a Picture Rail Hanging System
An OGEE picture rail system is made of four things: molding, rail hooks, cables, and picture hooks. These are their definitions and functions:
Picture Rail or Ogee Molding
The Ogee molding is a classic architectural form with a double curve that has an S-shape and a 5/8 inch bead or rounded edge. It’s a standard among designers and builders, and is very common in older homes. Most big box hardware stores carry it and it is sometimes called standard picture rail molding.
Aside from being a decorative addition to the wall, this molding is the integral part of the picture hanging system.
Picture Rail Hooks
These are hooks that are attached to the Ogee molding and hold the loop hanging cable. We carry two kinds of
picture rail hooks: wide and narrow rail hooks. They function exactly the same, so it’s just a matter of personal preference on the appearance of the hook.
Loop Cables for Hanging
The hanging cables are where the adjustable picture hooks are attached to, and they are suspended from the picture rail hooks. There are two types of hanging cables: nylon and steel.
Adjustable Picture Hooks
Adjustable picture hooks hold the frames you want to hang onto the hanging cables. Slide them up and down the cables to adjust, and tighten screws to secure.
Now you have an idea of what gallery systems are, let’s move on to the do’s and don’ts when using them!
Do's
The goal is to install and use gallery systems the proper and secure way. That said, here’s a list of things you should do when using picture rail hanging systems:
✓ Know the weight ratings of each component in a gallery system
Each component in a gallery kit has its own weight rating. When used all together, one must assume the lowest weight capacity among all components. In this case, the component with the lowest capacity is 25 lbs which are the picture rail hooks.
That means, for each hook, you can only hang frames that weigh a total of 25 lbs or lower. This applies regardless of the bigger weight capacity of the hanging cables and adjustable picture hooks. You can hang heavier items by using multiple cords and hooks.
✓ Hang more than 1 frames in one cable
You can hang one or more frames on one cable depending on the items size and weight. The loop hanging cables are 72 inches long which means there’s a lot of room for one big frame or several smaller frames. Just mind the total weight of the frames you’re going to hang in each picture rail hook.
✓ Coil the extra wire at the back of a frame
Extra cable dangling from under the frames doesn’t look very attractive. After hanging the frames on the cable, keep the extra cord out of sight by coiling it and putting it behind a frame. Doing so will keep your display elegant and clean from unnecessary clutter.
✓ Change layouts as you please
As mentioned earlier, picture rail hanging systems are highly adjustable. You can change layouts anytime without drilling and patching holes on the wall. You may slide the hooks left and right or up and down, switch the frames around, and remove or add more art and pictures.
Don’ts
As much as possible, we try to avoid mistakes to minimize damage. Let’s now discuss the things you shouldn’t do when using picture rail systems:
✓ Don’t drill any holes
Unlike other picture hanging hardware, you can let your power drill rest for this one. Since you already have the picture rail molding up on the wall, all you have to do is assemble the gallery kit.
Inside the gallery kit, you’ll find picture rail hooks, nylon or steel hanging cables, and adjustable picture hooks.
To assemble, you only need to hang the picture rail hooks onto the molding. Next, put the loop cable onto the picture rail hook and let it hang. Lastly, attach the adjustable picture hooks onto the hanging cables. Adjust everything accordingly and you’re good to go.
That's it, no additional holes in the wall required!
✓ Don’t go beyond the lowest weight rating
Imagine an expensive piece of artwork falling to the ground and the frame shattering into pieces. This would be an absolute nightmare.
Earlier in this article, we established that it’s a “must” to know the weight rating of each component in a picture rail hanging system. Now that you’re familiar with each component’s weight rating, make sure to keep this in mind when hanging your art.
Avoid hanging artwork and pictures that weigh over the weight capacity. Cables and hooks might break, rail hooks could go flying, which could cause your frames to fall and break.
✓ Don’t use the rail hooks on other types of rails
We carry two types of picture rail hooks and both are intended to be used on OGEE or OG picture rail molding: Wide Picture Rail Hooks and Narrow Picture Rail Hooks.
The
picture rail hooks are thoughtfully designed to fit an Ogee molding seamlessly. It has an S shape with additional curves to fit the rail perfectly. That said, we don’t recommend you use it on other types of rail molding as it may not be the perfect fit.
A picture rail hanging system is perfect for you if you already have an Ogee molding in your space or you want to install it, and if you’re looking for a damage-free way of hanging frames! They’re easy to use, highly adjustable, and hassle-free.
Good morning,
We live in Alberta, Canada. Is there any place in Canada that I can find the Ogee rail and hanging systems? I love this idea but from experience know that ordering from the states can be very expensive.
Thank you for you help
Donna Akins