


S-SEC-2P
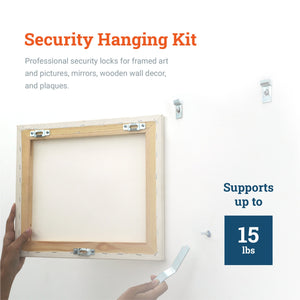
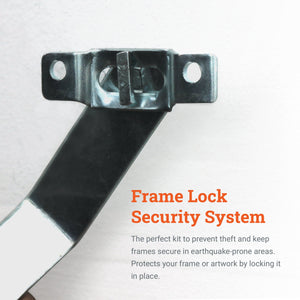
Security kits are picture hanging sets with all hardware needed to hang pictures with a higher level of security. A frame-locking feature makes this possible, preventing theft and falling, especially during earthquakes and high-traffic situations. Hang pictures with a security kit at home or in commercial spaces like restaurants, hotels, and art galleries—the hardware will stay hidden behind the frame, maintaining a clean and classy presentation on top of a secure display.
Secure multi-point picture locking system for fall-proof and anti-theft framed art and pictures, mirrors, wooden wall decor, and plaques up to 24” wide
For frames wider than 24”, twoT-Head screws are recommended
Supports up to 15 lbs
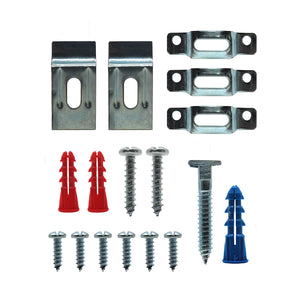
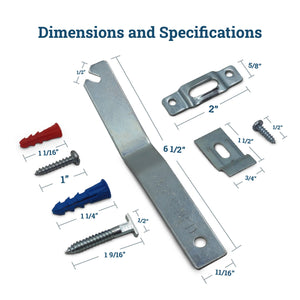
Each security kit includes:
Two (2) wall brackets, 3/4" wide and 1 1/2" long
Three (3) mounting plates, 2” wide and 5/8" long
One (1) T-Head screw, 1 9/16” long
Two (2) #10 screws, 1” long
Two (2) red or white wall bracket plastic anchors, 11/16” long
Six (6) #6 screws, ½” long
One (1) T-Head screw plastic anchor, 1 ¼” long
One (1) standard security wrench
Note: Quantities of 25 or more are bulk packed (not packed as individual sets) -Contact us if you need the kits packaged individually as this will incur an additional cost.
Place the frame face-down on a soft surface.
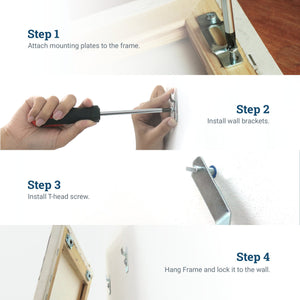
Attach the mounting plates to the back of the frame using the ½” screws. For wood frames, mount two plates on top (2” from the side edges) and one at the bottom (centered). Pre-drill screw holes to avoid splitting the wood.
For larger wood frames, install a fourth plate (sold separately) on the bottom rail 2” from the side edge. For thinner wood frames, make sure that the frame is adequately braced internally so it remains rigid under load. The minimum depth required to safely attach mounting plates is ¾”.
Align the upper mounting plates with the brackets’ positions on the wall. Mark the spots.
Mark your desired position of the top edge of the frame on the wall.
Drill two 1/4" dia. holes in the wall about 1 1/4" down from where you want the top edge of the frame and spaced apart at the distance measured in step 3. Make sure that these holes are as level as possible.
Insert the red or white plastic anchors provided. TIP: If the plastic anchors start to deform while hammering them, re-drill the holes in step 5 using a 5/16" drill bit.
Using the 1" screws, install the two wall brackets so that the flanged ends of the brackets face up and away from the wall. Do not over-tighten the screws.
Slide the frame down on the wall until the mounting plates sit snugly on the wall brackets.
Check that the frame is level. Adjust as needed by removing the frame from the wall, loosening the wall bracket screws slightly, shifting the brackets up or down as needed in their slots, and retightening the screws.
With the frame hung on the wall brackets, lightly pencil-mark the position of the frame, tracing from a side edge/s to the center of the bottom mounting plate.
Remove the frame from the wall.
Measure from the lower edge of the frame's bottom rail to the center of the slot in the mounting plates. Mark this measurement on the wall alongside the measurement in step 10.
Drill a 5/16" dia. hole at the marked spot and gently hammer the blue T-Head screw plastic anchor into the drilled hole until it’s flush with the wall surface.
Thread the T-Head screw into the plastic anchor until about 3/8" extends from the wall surface. Start by hand and complete using the security wrench. Then, align the T-Head to a final horizontal position.
Hang the frame on the wall brackets. The T-Head screw should fall inside the slot of the mounting plate on the bottom rail.
From the right-hand side, slide the security wrench under the bottom edge of the frame and, without lifting the frame from the wall, engage and rotate the T-Head screw clockwise with a one-quarter turn to a vertical position. The frame is now locked to the wall.